| Name |
Effect |
Location |
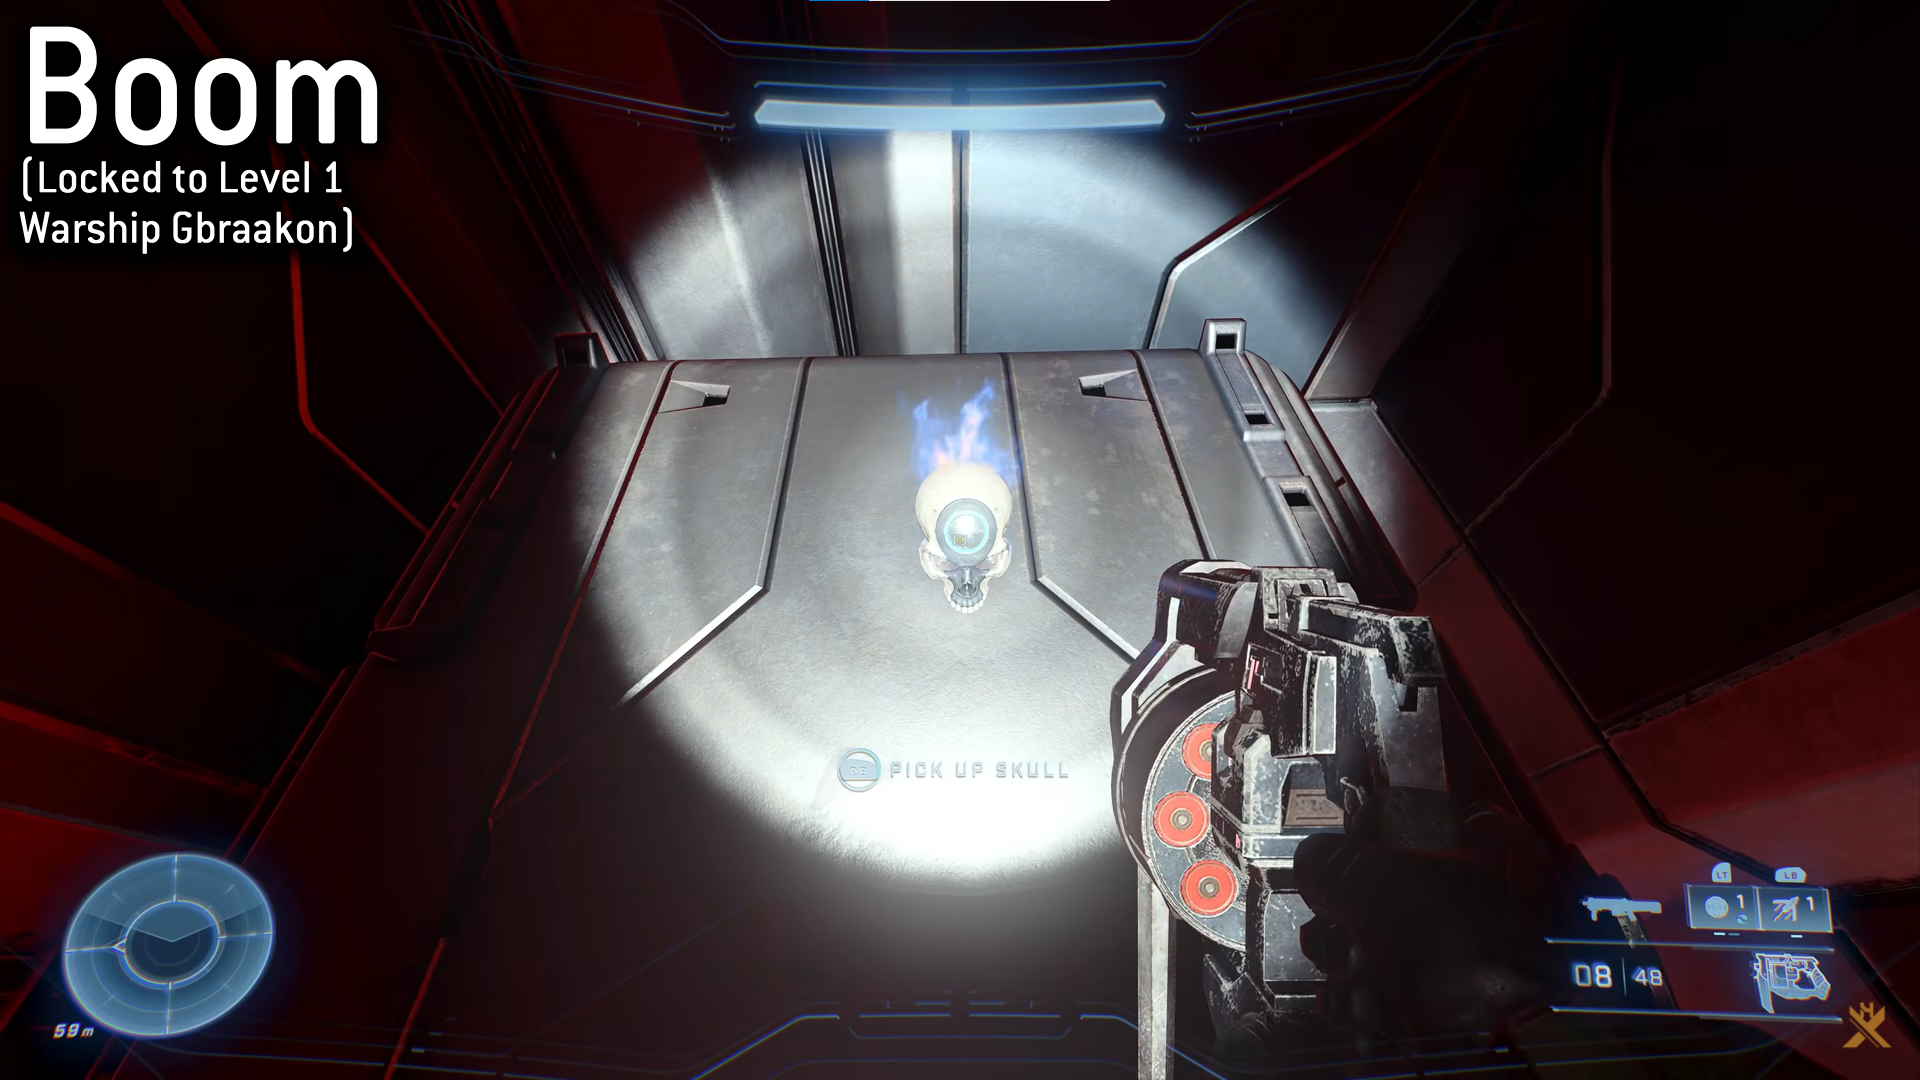
| Boom |
The radius of an explosion is doubled. |
- The first skull can be found during the first quest, but it’s easy to miss.
- You’ll find yourself in a lengthy room on the Warship Gbraakon, with a floor above you and three moving lifts to your right.
- Through the breach in the ceiling, climb to the second story and board the middle lift.
- If you’re facing the wall, the Boom skull is sitting on a container to your right.
|
| Cowbell |
The speed of explosions is increased. |
- During the Foundation expedition, the second Halo Infinite skull is discovered. It’s difficult to obtain, let alone locate.
- You’ll arrive at a hologram-filled region after picking up the Weapon.
- Continue on until you enter a large area, then turn left until you reach the point where the room opens up, then use your scanner to discover the skull high above you.
- It’s difficult to reach, but if you keep using your grapple to climb higher, you’ll ultimately get there.
|
| Catch |
More grenades are thrown and dropped by enemies. |
- Head to the northern region of the map once you’ve reached Zeta Halo’s open world.
- To the northwest of Outpost Tremonius, you should encounter a canyon.
- There are adversaries here, but you can reclaim the Catch skull from a tree stump once you’ve defeated them.
|
Fog
|
The motion tracker is off.
|
-
This skull is in a small cave on the map’s very western edge.
-
It’s virtually exactly west of Halo Infinite FOB Alpha, and getting there with a vehicle will be considerably easier.
-
Search for a ledge at the western edge of the hexagonal columns. Among several abandoned helmets, the Fog skull is found inside an opening above the narrow shelf.
|
| I Would Have Been Your Daddy (IWHBYD). |
It gets increasingly common to hear rare combat talk. |
- The IWHBYD skull is on top of The Tower, and if you look closely, you can also notice the Craig easter egg nearby.
- Taking a flying vehicle to the top is the most convenient way to get there.
- Once you’re up there, search the area around the central structure for a collection of containers, where you’ll discover the skull perched atop a chest.
|
| Blind |
The HUD and weapon do not appear on the screen. |
- The next skull can be discovered south of The Tower, where the last Halo Infinite skull was found.
- A deep ravine should be visible here, so utilize a flying aircraft to investigate beneath the surface.
- Here, the Blind skull can be found in a well-hidden cave. Make use of your scanner to assist you in pinpointing the exact position.
|
| Thunderstorm |
Most foes’ ranks are raised. |
- The Thunderstorm skull is another difficult find. It’s atop a hexagonal column, seemingly in the midst of nowhere.
- It’s close to the anti-aircraft gun area, and you’ll need to utilize your scanner to pinpoint its exact location.
- Look around for a cluster of hexagonal columns once you’ve spotted the AA cannons.
- The one you’re looking for is quite little and stands a little off to the side of the main group.
|
| Black Eye |
Only when you melee adversaries do your shields replenish. |
- The Black Eye skull is discovered in a grotto hidden behind a high waterfall.
- Even when you’re close, the entry is small and difficult to spot—look for the dark outline of the entrance on the right side of the waterfall, around halfway up.
- Once inside, look for the skull on top of a stalagmite near the cave’s back.
|
Famine
|
Enemy-dropped weapons have half the ammo they would normally have. |
- This skull is on Zeta Halo’s far eastern outskirts. On your map, the region you’ll be visiting appears to be a small island.
- The Famine skull is next to a dead elite on a cliff. Because of the bright yellow armor, the position is a little easier to see from the air.
|
| Mythic |
Enemies’ health has improved. |
- You’ll reach a region where columns are passed through light and imprinted with markings once you’ve completed the Command Spire mission.
- You’ll need to cling to one of the moving columns, then through the hole above you to reach the darker area above.
- From here, use your grapple to reach a hard-to-see door higher up and get the Mythic skull from the room at the end of the corridor.
|
| Grunt Birthday Party skull |
Grunt headshots result in jubilant celebrations.
|
- During the Repository mission, a Grunt Birthday Party skull is discovered. You’ll find yourself in a room with a terminal in the middle.
- Activate the terminal to summon a light bridge that leads to one of the room’s exterior doors. Make your way to the right-hand door.
- Take the power seed from the interior at the end of the corridor to the room on the other side.
- You’ll be greeted by golden metal plating on the walls of your room. If you gaze upon the wall ahead, you should see an opening that you can reach with your grapple.
- This opening would be unreachable if you hadn’t placed the power seed before. There are a few elites to deal with here, you can take the Grunt Birthday Party skull.
|
Bandana
|
Removes equipment cooldowns and grants infinite weapon ammunition and grenades. |
- During the Silent Auditorium task, the final skull is discovered. If you kill any sentinels before entering the huge area, the final skull will not spawn.
- Instead, keep going until you reach a pair of light bridges in the level. Activate them and walk across the room into a long room.
- Grapple up to the top of the structure in the center to claim your treasure, which is a Bandana skull.
|